How to Effectively Paint Aluminum for Long-Lasting Results
How to Paint Aluminum for Durable, Professional Results
Aluminum is one of the most widely used metals in manufacturing, but getting paint to stick reliably requires more than grabbing a can and going to work. This guide walks through the complete process to paint aluminum-from surface preparation and primer selection through to curing and long-term maintenance-so you can achieve a finish that holds up in real-world conditions.
Quick Answer: Can You Paint Aluminum Successfully?
Yes, you can paint aluminum with excellent results. The key is preparation. Aluminum surfaces require proper cleaning and priming before painting-skip either step and you’re likely dealing with peeling, bubbling, or delamination within weeks. Self etching primer improves paint adhesion on aluminum surfaces by chemically biting into the metal, creating a bond that generic primers simply cannot match.
Will spray paint stick to raw aluminum? It can, but only if you degrease the surface, scuff it mechanically, and prime it first. Without those steps, the paint will lift. A fast, one-day workflow-degrease, sand, prime, top coat-works well for prototypes and jigs. OEM production runs typically span multiple days and include conversion coatings, controlled spray booths, and bake cycles for maximum durability.
How does painting compare to other finishes? Anodizing delivers superior wear resistance and UV stability (1,000+ hours salt spray vs. 200–500 hours for standard paint systems), while powder coating falls in between. Paint wins on color flexibility, repairability, and cost for low volumes. Anebon Metal Products Limited can deliver aluminum parts bare, pre-treated, or fully finished to your spec-whatever the project demands.
Understanding Aluminum Surfaces Before Painting
Aluminum behaves differently from steel when you try to paint it. Steel rusts progressively, but aluminum self-passivates-the oxide layer on aluminum prevents proper paint adhesion by forming a thin, chemically inert barrier (2–5 nm thick) within minutes of machining. You may have noticed that freshly machined parts look clean, yet paint still won’t stick. That oxide is the reason.
Here’s what to keep in mind for common aluminum forms:
-
CNC machined parts (6061, 7075, 2024 alloys): often have machining oils and a smooth or mirror finish that needs aggressive scuffing before any coat will hold. Learn more about aluminum surface treatment for CNC machined parts.
-
Die castings (alloys 380, 383): higher silicon content, surface porosity, and residual mold release agents present additional challenges. Roughen the surface to create mechanical adhesion for paint on these parts.
-
Extrusions and sheet metal panels: may carry mill coatings, protective plastic film, or residual drawing oils that must be removed completely.
-
Contaminants: coolant emulsions, fingerprints, and handling grease create fish-eyes and blistering. Even a dirty surface that looks acceptable will cause failures.
-
Polished surfaces: mirror-finish machined aluminum has almost zero mechanical profile-primers rely entirely on chemical adhesion, making etch or conversion coating critical.
-
Galvanic corrosion: if painted aluminum will contact stainless steel, copper, or other noble metals outdoors, any chip or scratch exposes bare metal to galvanic action. Edge sealing matters.
Tools and Materials for Painting Aluminum
Using the right stuff matters more than chasing a specific brand. Here’s what you need:
-
Cleaning solvents: acetone or isopropyl alcohol (90%+ concentration) for degreasing; dedicated wax-and-grease removers from body-shop suppliers also work well. Clean aluminum with acetone or isopropyl alcohol until a wipe on a white cloth shows zero residue.
-
Abrasives: 220–320 grit sandpaper or Scotch-Brite scuff pads for initial surface preparation; 400–600 grit for smoothing between coats.
-
Self etching primer: contains zinc phosphate or phosphoric acid compounds that etch into bare aluminum for reliable adhesion. Self-etching primer improves paint adhesion on aluminum.
-
Epoxy primer: use epoxy primer for chemical resistance on aluminum, especially in outdoor, marine, or industrial chemical environments.
-
Top coat options: alkyd enamel spray paint for prototypes (acrylic paints for aluminum cost $20 to $50 per gallon), 2K urethane for high-performance OEM work, and acrylic latex for architectural façade panels or siding.
-
Conversion coatings (optional, industrial): chromate-free, RoHS-compliant chem films improve corrosion resistance and paint adhesion in production environments.
-
Safety gear: nitrile gloves, safety glasses, organic vapor respirator-mandatory whenever you spray solvent-heavy primers or urethane coatings.

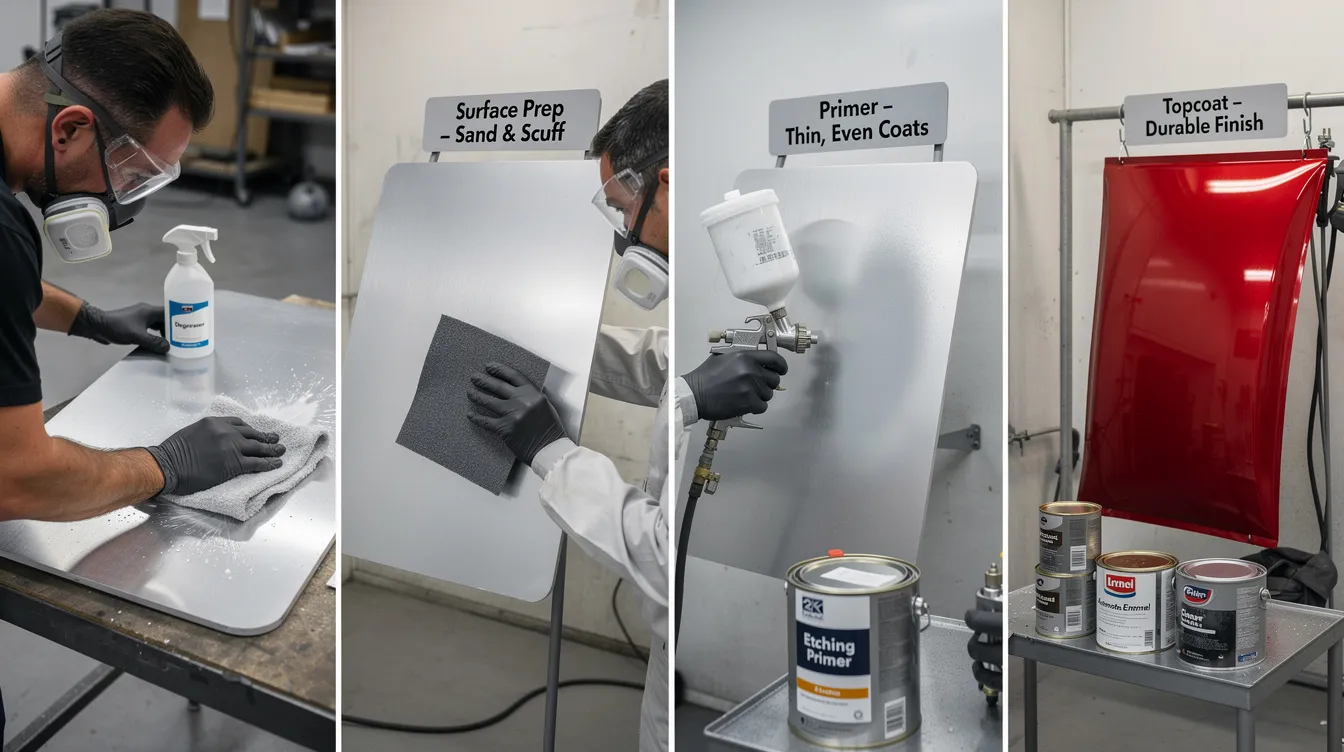
Step‑by‑Step: How to Paint Raw Aluminum
This method covers a practical workflow suitable for prototypes, jigs, machine brackets, and small production runs. A technician can follow these steps in order for consistent success.
-
Clean: degrease the entire surface area with acetone or isopropyl alcohol. Wipe with a lint-free cloth. If the part came from die casting or sheet stock, remove any protective film first. Proper preparation includes degreasing to remove oils that can affect adhesion. Rinse with clean solvent and let dry. For large panels, you can pre-wash with a garden hose and mild detergent, then follow up with solvent-just make sure the surface is fully dry before moving on.
-
Sand: scuff the entire surface with 320 grit sandpaper. Surface sanding creates microscopic grooves for primer adhesion. Sand aluminum with 320 grit sandpaper for better paint adhesion, paying deep attention to edges, radii, corners, and drilled holes where paint tends to thin out.
-
Etch / conversion coat (optional): for an industrial-grade result, soak aluminum in phosphoric acid for 30 minutes to etch the surface. OEM processes often use proprietary conversion coatings at this point. For a one-off shop job, this step is optional if you’re using a quality self etching primer.
-
Prime: use a self-etching primer for aluminum surfaces before painting. Apply several light coats from a sprayer held 20–30 cm away, waiting 10–15 minutes between passes for flash time. Two coats of primer typically fill minor sanding marks and create a uniform base. Avoid heavy, wet passes-they run and trap solvent.
-
Top coat: finally, apply two to three light coats of your chosen top coat. Light coats of paint should be applied every 15-30 minutes for aerosol products. Aim for uniform coverage without runs. For instance, Sherwin Williams and other industrial coating suppliers offer 2K urethane systems that deliver outstanding gloss and protection.
-
Cure: environmental conditions affect paint curing, with moderate temperatures being ideal-aim for a warm, dust-free environment around 18–25 °C. Allow at least 24 hours air dry for consumer spray paints. Industrial parts often go through a bake cycle at 60–80 °C. Test adhesion on a hidden area with a fingernail scrub or cross-hatch test before handling.

Using Spray Paint on Aluminum Parts
Spray paint is ideal for rapid prototyping, color-coding fixtures, and low-volume components where perfect cosmetics aren’t the point. If you’re curious about whether a rattle-can finish is “good enough,” it often is for internal parts.
-
Apply in 2–3 light, overlapping passes rather than one heavy coat-this gives better adhesion and fewer runs on aluminum.
-
Industrial enamel sprays in safety red or yellow are commonly used to mark brackets, gussets, and CNC-machined guards in robotics and automation setups. Some facilities even use a spray bot on automated lines for consistent coverage.
-
For faster drying, use low-temperature heat lamps or a 50–60 °C oven, but avoid overheating thin sheet metal-it can warp.
-
Total process time for a small bracket: roughly 1–2 hours of active work spread over a 1-day drying period.
Common Mistakes When Painting Aluminum
Most paint failures on aluminum trace back to preparation errors. Here are the ones to avoid:
-
Skipping degreasing: the single most frequent cause of fish-eyes, peeling, and poor adhesion on raw aluminum.
-
Inadequate sanding: trying to paint over polished or as-machined surfaces without any scuff guarantees the paint won’t stick long-term.
-
Wrong primer: oil-based or latex primers should not be used directly on bare aluminum. Use a self-etching or epoxy primer instead.
-
Thick, wet coats: heavy single passes create runs, drips, and internal stress that leads to cracking and chipping.
-
Excessive heat for curing: cranking up oven temperature to save time can cause blistering or distort thin components.
-
High-gloss paints on rough surfaces: avoid high-gloss paints if the aluminum surface has imperfections, as gloss amplifies every flaw.
Industrial vs. DIY Approaches to Painting Aluminum
The gap between a shop-floor spray job and an OEM-grade paint system is significant. DIY workflows-aerosol spray, hand sanding, air drying-are perfectly fine for internal machine parts, brackets, and non-critical covers. They’re fast and affordable.
Industrial workflows involve automated washing, conversion coating with chromate-free chemicals, spray booths with environmental controls, and documented bake cycles. OEMs in sectors like automotive, medical devices, and aerospace typically specify epoxy primer plus urethane top coat over pre-treated aluminum for long-term durability. This is where research into coating systems and adhesion testing pays off.
Anebon can either ship precision CNC machined aluminum parts ready for your in-house painting line, or supply components with pre-applied finishes arranged through certified finishing partners.
Painting Aluminum in OEM Production Environments
In a typical OEM scenario-hundreds or thousands of identical aluminum housings produced monthly-the paint process is tightly controlled:
-
Incoming inspection: verify alloy type, surface condition, and dimensional conformance of raw aluminum parts.
-
Cleaning and de-oxidizing: aqueous wash systems or solvent baths, followed by rinse stages.
-
Conversion coating: chromate-free chem film applied to fill the adhesion gap and improve corrosion resistance.
-
Primer and top coat application: controlled spray of epoxy primer and urethane top coat in temperature/humidity-regulated booths.
-
QC checks: cross-hatch adhesion testing (ASTM D3359), film thickness measurement, and color matching to RAL or Pantone references using photos and spectrophotometer readings.
-
Traceability: batch records for alloy, conversion coating lot, primer, paint mixing ratios, and curing conditions. This detail is what separates a reliable finish from a cosmetic gamble.
Durability, Corrosion Resistance, and Maintenance
Aluminum’s natural corrosion resistance gives painted parts a head start, but the primer and top coat system determine how long that protection lasts.
-
High-quality exterior-grade paints are necessary to resist weathering. Quick, single-stage aerosols outdoors typically last 3–5 years before significant fading and chalking. Aluminum paint jobs require reapplication every few years in exposed conditions.
-
Well-prepared epoxy primer plus urethane top coat systems can last 5–10+ years under normal weather. The use of clear enamel sealers after paint application increases durability further.
-
Paint on aluminum siding lasts 4–6 years before needing repainting. Apply two coats of oil-based primer for aluminum siding to maximize longevity. Painting aluminum siding costs $10,345 to $19,253 less than replacement-painting is more affordable than replacing aluminum siding.
-
In marine environments, properly maintained systems can yield 40 years of paint service life on aluminum structures.
-
Properly painted aluminum can resist scratches after curing, but edge protection is critical-thin paint on corners and sharp chamfers chips first.
-
Maintenance: periodic inspection, washing with mild detergent, and touch-up of chips prevent underfilm corrosion. For sheet metal enclosures in coastal or industrial atmospheres, plan for repaint intervals of 8–15 years depending on UV exposure and climate.
When Painting Aluminum Is Not the Best Option
Some applications are better served by other finishes. Before you default to paint, consider:
-
Anodizing: where very high wear resistance, metallic appearance, or precise color stability are required-consumer electronics housings, optical components, anodized CNC parts.
-
Powder coating: larger enclosures, racks, and machine frames where impact resistance and thicker, uniform coverage matter more than repairability.
-
Bare with conversion coat only: internal structural components not exposed to weather or aggressive chemicals-no paint needed, just protection from mild atmospheric corrosion.
-
Align your finish choice with functional requirements, cost targets, and aesthetic expectations. We hope this framework is helpful as you evaluate options for your next project.
How Anebon Supports Painted Aluminum Projects
Anebon Metal Products Limited is a precision CNC machining, die casting, and sheet metal fabrication partner established in 2010 in Dongguan, China. We primarily serve overseas OEMs and R&D teams who need aluminum components delivered raw, pre-treated, or with arranged surface finishes.
Our capabilities relevant to painted aluminum projects include CNC milling and turning for complex housings, 5-axis machining for contoured surfaces, die casting for higher volumes, and sheet metal fabrication for enclosures and panels. Our DFM support includes recommendations on fillets, wall thickness, and edge radii that improve paint coverage and reduce chipping at corners.
With ISO 9001:2015 and ISO 14001:2015 certifications, our quality systems ensure consistent surface preparation and inspection before any finishing step. Contact our engineering team or visit our website to request a quote if you need aluminum parts prepared for painting, anodizing, or powder coating as part of a broader OEM project. Note that we can coordinate finishing through certified partners to create a single-source supply chain that helps you save time and cost.
Related Topics and More Posts to Explore
If you found this post helpful, explore these related topics on our blog:
-
Guides on selecting parameters for machining aluminum on CNC machines and achieving superior surface finishes in CNC turning.
-
A comparison of anodizing effects on surface quality versus painting for OEM parts.
-
Future posts will cover specific case studies-like painting aluminum enclosures for electronics or color-coding robotic end-effectors in automated lines.
-
Look for more posts on surface treatments, rapid prototyping workflows, and finishing options for metals and plastics across our blog.