Exclusive Interview: Understanding the Importance of Machining Process Knowledge
1. What are the three methods of clamping workpieces?
There are three methods of clamping workpieces which include:
1) Clamping in the fixture
2) Finding the correct clamp directly
3) Marking the line and finding the correct clamp.
2. What does the processing system include?
The processing system includes machine tools, workpieces, fixtures, and tools.
3. What are the components of the mechanical processing process?
The components of the mechanical processing process are roughing, semi-finishing, finishing, and super-finishing.
4. How are benchmarks classified?
Benchmarks are classified as follows:
1. Design basis
2. Process basis: process, measurement, assembly, positioning: (original, additional): (coarse basis, acceptable basis)
What does processing accuracy include?
Processing accuracy includes dimensional accuracy, shape accuracy, and position accuracy.
5. What does the original error that occurs during the processing include?
The original error that occurs during processing includes principle error, positioning error, adjustment error, tool error, fixture error, machine tool spindle rotation error, machine tool guide rail error, machine tool transmission error, process system stress deformation, process system thermal deformation, tool wear, measurement error, and workpiece residual stress error caused by.
6. How does the stiffness of the process system affect machining accuracy, such as machine tool deformation and workpiece deformation?
This can cause workpiece shape errors due to changes in the position of the cutting force application point, processing errors caused by changes in the size of the cutting force, processing errors caused by clamping force and gravity, and the impact of transmission force and inertial force on processing accuracy.
7. What are the errors in machine tool guidance and spindle rotation?
The guide rail can cause relative displacement errors between the tool and the workpiece in the error-sensitive direction, while the spindle can have radial circular runout, axial circular runout, and inclination swing.
8. What is the “error re-image” phenomenon, and how can we reduce it?
When the process system error deformation changes, the blank error is partially reflected on the workpiece. To reduce this effect, we can increase the number of tool passes, increase the stiffness of the processing system, reduce the feed amount, and improve the blank accuracy.
9. How can we analyze and reduce the transmission error of the machine tool transmission chain?
The error analysis is measured by the rotation angle error Δφ of the end element of the transmission chain. To reduce transmission errors, we can use fewer transmission chain parts, have a shorter transmission chain, use a smaller transmission ratio I (especially at the first and last ends), make the end parts of the transmission parts as accurate as possible, and use a correction device.
10. How are processing errors classified? Which errors are constant, variable-valued systematic errors, and random errors?
System error: (constant value system error, variable value system error) random error.
Constant system error: machining principle error, manufacturing error of machine tools, tools, fixtures, stress deformation of the processing system, etc.
Variable value system error: wear of props; thermal deformation error of tools, fixtures, machine tools, etc., before thermal balance.
Random errors: copying of blank errors, positioning errors, tightening errors, errors of multiple adjustments, deformation errors caused by residual stress.
11. What are the ways to ensure and improve processing accuracy?
1) Error prevention technology: Reasonable use of advanced technology and equipment to directly reduce the original error, transfer the original error, average the original error, and average the original error.
2) Error compensation technology: online detection, automatic matching and grinding of even parts, and active control of the decisive error factors.
12. What does the processing surface geometry include?
Geometric roughness, surface waviness, grain direction, surface defects.
13. What are the physical and chemical properties of surface layer materials?
1) Cold work hardening of surface layer metal.
2) Metallographic structure deformation of surface layer metal.
3) Residual stress of surface layer metal.
14. Analyze the factors that affect the surface roughness of cutting processing.
The roughness value is determined by the height of the cutting residual area. The main factors are the arc radius of the tooltip, the main declination angle, and the secondary declination angle, feed amount. Secondary factors are the increase in cutting speed, the appropriate choice of cutting fluid, the appropriate increase of the rake angle of the tool, and the improvement of the edge of the tool, grinding quality.
15. Factors Affecting Surface Roughness in Grinding Processing:
Geometric factors such as the amount of grinding, the particle size of the grinding wheel, and the dressing of the grinding wheel can influence surface roughness.Physical factors, such as the plastic deformation of the surface layer metal and the selection of grinding wheels, can also affect the surface roughness.
16. Factors Affecting Cold Work Hardening of Cutting Surfaces:
The amount of cutting, the geometry of the tool, and the properties of the processing material can all influence cold work hardening of cutting surfaces.
17. Understanding Grinding Temper Burn, Grinding and Quenching Burns, and Grinding Annealing Burn:
Tempering occurs when the temperature in the grinding zone does not exceed the phase transformation temperature of quenched steel but exceeds the transformation temperature of martensite. This results in a tempered structure with lower hardness. Quenching occurs when the temperature in the grinding zone exceeds the phase transformation temperature, and the surface metal has a secondary quenching martensite structure due to cooling. This has a higher hardness than the original martensite in its lower layer and a tempered structure with a lower hardness than the original tempered martensite. Annealing occurs when the temperature in the grinding zone exceeds the phase transition temperature, and there is no coolant during the grinding process. This results in an annealed structure and a sharp drop in hardness.
18. Prevention and Control of Mechanical Processing Vibration:
To prevent and control mechanical processing vibration, you should eliminate or weaken the conditions that produce it. You can also improve the dynamic characteristics of the processing system, improve its stability, and adopt various vibration reduction devices.
19. Briefly describe the main differences and application occasions of machining process cards, process cards, and process cards.
Process card: Single piece and small batch production are carried out using ordinary processing methods.
Mechanical processing technology card: “Medium batch production” refers to the manufacturing process where a limited quantity of products is produced at a time. On the other hand, “large-volume production” requires careful and organized work to ensure that the production process runs smoothly and efficiently. It is essential to maintain strict quality control measures in such cases.
*20. What are the principles for selecting rough benchmarks? Principles for fine benchmark selection?
Rough datum: 1. The principle of ensuring mutual position requirements; 2. The principle of ensuring reasonable distribution of machining allowance on the machined surface; 3. The principle of facilitating workpiece clamping; 4. The principle that rough data generally cannot be reused
Precision datum: 1. The principle of datum coincidence; 2. The principle of unified datum; 3. The principle of mutual datum; 4. The principle of self-benchmark; 5. The principle of convenient clamping
21. What are the principles for arranging the process sequence?
1) Process the datum surface first and then process other surfaces;
2) In half of the cases, process the surface first and then process the holes;
3) Process the main surface first, and then process the secondary surface;
4) Arrange the rough machining process first, and then arrange the fine machining process. Processing steps
22. How do we divide the processing stages? What are the benefits of dividing processing stages?
Division of processing stages: 1. Rough machining stage – semi-finishing stage – finishing stage – precision finishing stage
Dividing the processing stages can help in ensuring enough time to eliminate thermal deformation and residual stress caused by rough machining, resulting in an improvement in subsequent processing accuracy. Additionally, if defects are found in the blank during the rough machining stage, proceeding to the next stage of processing can be avoided to prevent waste.
Moreover, equipment can be utilized rationally by using low-precision machine tools for rough machining and reserving precision machine tools for finishing to maintain their accuracy level. Human resources can also be arranged efficiently, with high-tech workers specializing in precision and ultra-precision machining to ensure both metal parts quality and process level improvement, which are critical aspects.
23. What are the factors that affect process margin?
1) The dimensional tolerance Ta of the previous process;
2) The surface roughness Ry and surface defect depth Ha produced by the previous process;
3) The spatial error left by the previous process
24. What does the working hour quota consist of?
T quota = T single piece time + t accurate final time/n number of pieces
25. What are the technological ways to improve productivity?
1) Shorten the basic time;
2) Reduce the overlap between auxiliary time and basic time;
3) Reduce the time of arranging work;
4) Reduce the preparation and completion time.
26. What are the main contents of the assembly process regulations?
1) Analyze product drawings, divide assembly units, and determine assembly methods;
2) Develop the assembly sequence and divide the assembly processes;
3) Calculate assembly time quota;
4) Determine the assembly technical requirements, quality inspection methods, and inspection tools for each process;
5) Determine the transportation method of assembly parts and the required equipment and tools;
6) Select and design tools, fixtures, and special equipment required during assembly
27. What should be considered in the assembly process of the machine structure?
1) The machine structure should be able to be divided into independent assembly units;
2) Reduce repairs and machining during assembly;
3) The machine structure should be easy to assemble and disassemble.
28. What does assembly accuracy generally include?
1. Mutual position accuracy; 2. Mutual motion accuracy; 3. Mutual cooperation accuracy
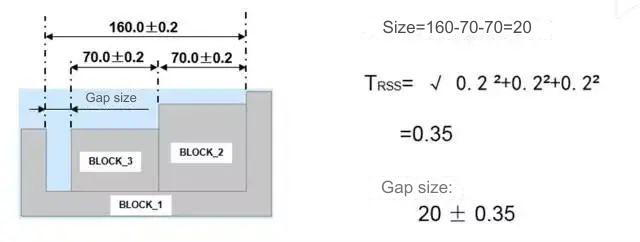
29. What issues should be paid attention to when searching for assembly dimension chains?
1. Simplify the assembly dimension chain as necessary.
2. The assembly dimension chain should consist of only one piece and one link.
3. The assembly dimension chain has directionality, meaning that in the same assembly structure, there may be assembly accuracy differences in different positions and directions. If needed, the assembly dimension chain must be supervised in different directions.
30. What are the methods to ensure assembly accuracy? How are the various methods applied?
1. Interchange method; 2. Selection method; 3. Modification method; 4. Adjustment method
31. What are the components and functions of machine tool fixtures?
A machine tool fixture is a device used to clamp the workpiece on a machine tool. The fixture has several components, including positioning devices, tool guiding devices, clamping devices, connecting components, clamp body, and other devices. The function of these components is to keep the workpiece in the right position concerning the machine tool and cutting tool and maintain this position during the machining process.
The fixture’s main functions include ensuring processing quality, improving production efficiency, expanding the scope of machine tool technology, reducing workers’ labor intensity, and ensuring production safety. This makes it an essential tool in any machining process.
32. How are machine tool fixtures classified according to their usage range?
1. Universal fixture 2. Special fixture 3. Adjustable fixture and group fixture 4. Combined fixture and random fixture
33. The workpiece is positioned on a plane. What are the commonly used positioning components?
And analyze the situation of eliminating degrees of freedom.
The workpiece is placed on a plane. Commonly used positioning components include fixed support, adjustable support, self-positioning support, and auxiliary support.
34. The workpiece is positioned with a cylindrical hole. What are the commonly used positioning components?
The workpiece is positioned with a cylindrical hole. What are the Commonly used positioning components for a workpiece with a cylindrical hole include spindle and positioning pin. The situation of eliminating degrees of freedom can be analyzed.
35. When positioning a workpiece on an outer circular surface, what are the commonly used positioning components? And analyze the situation of eliminating degrees of freedom.
The workpiece is positioned on the outer circular surface. Commonly used positioning cnc turned components include V-shaped blocks.
Anebon is committed to achieving excellence and improving its measures to become a top-grade and high-tech enterprise on an international level. As a China Gold Supplier, we specialize in providing OEM services, custom CNC machining, sheet metal fabrication services, and milling services. We take pride in catering to our clients’ specific needs and strive to meet their expectations. Our business comprises several departments, including production, sales, quality control, and service center.
We offer precision parts and aluminum parts that are unique and designed to meet your requirements. Our team will work closely with you to create a personalized model that is distinct from other parts available in the market. We are dedicated to providing you with the best possible service to meet all your needs. Do not hesitate to reach out to us at Anebon and let us know how we can assist you.


