Common Hardness Comparison Table | Most Complete Collection
HV, HB, and HRC are all measurements of hardness used in materials testing. Let’s break them down:
1)HV Hardness (Vickers Hardness): HV hardness is a measure of a material’s resistance to indentation. It is determined by applying a known load to the surface of the material using a diamond indenter and measuring the size of the resulting indentation. HV hardness is expressed in units of Vickers hardness (HV) and is commonly used for thin materials, coatings, and small parts.
2)HB Hardness (Brinell Hardness): HB hardness is another measure of a material’s resistance to indentation. It involves applying a known load to the material using a hardened steel ball indenter and measuring the diameter of the resulting indentation. HB hardness is expressed in units of Brinell hardness (HB) and is often used for larger and bulkier materials, including metals and alloys.
3)HRC Hardness (Rockwell Hardness): HRC hardness is a measure of a material’s resistance to indentation or penetration. It uses different scales (A, B, C, etc.) based on the specific testing method and the type of indenter used (diamond cone or hardened steel ball). The HRC scale is commonly used for measuring the hardness of metallic materials. The hardness value is represented as a number on the HRC scale, such as HRC 50.
Commonly used HV-HB-HRC hardness comparison table:
| Common ferrous metal hardness comparison table (approximate strength conversion) | ||||
| Hardness classification |
Tensile strength N/mm2 |
|||
| Rockwell | Vickers | Brinell | ||
| HRC | HRA | HV | HB | |
| 17 | — | 211 | 211 | 710 |
| 17.5 | — | 214 | 214 | 715 |
| 18 | — | 216 | 216 | 725 |
| 18.5 | — | 218 | 218 | 730 |
| 19 | — | 221 | 220 | 735 |
| 19.5 | — | 223 | 222 | 745 |
| 20 | — | 226 | 225 | 750 |
| 20.5 | — | 229 | 227 | 760 |
| 21 | — | 231 | 229 | 765 |
| 21.5 | — | 234 | 232 | 775 |
| 22 | — | 237 | 234 | 785 |
| 22.5 | — | 240 | 237 | 790 |
| 23 | — | 243 | 240 | 800 |
| 23.5 | — | 246 | 242 | 810 |
| 24 | — | 249 | 245 | 820 |
| 24.5 | — | 252 | 248 | 830 |
| 25 | — | 255 | 251 | 835 |
| 25.5 | — | 258 | 254 | 850 |
| 26 | — | 261 | 257 | 860 |
| 26.5 | — | 264 | 260 | 870 |
| 27 | — | 268 | 263 | 880 |
| 27.5 | — | 271 | 266 | 890 |
| 28 | — | 274 | 269 | 900 |
| 28.5 | — | 278 | 273 | 910 |
| 29 | — | 281 | 276 | 920 |
| 29.5 | — | 285 | 280 | 935 |
| 30 | — | 289 | 283 | 950 |
| 30.5 | — | 292 | 287 | 960 |
| 31 | — | 296 | 291 | 970 |
| 31.5 | — | 300 | 294 | 980 |
| 32 | — | 304 | 298 | 995 |
| 32.5 | — | 308 | 302 | 1010 |
| 33 | — | 312 | 306 | 1020 |
| 33.5 | — | 316 | 310 | 1035 |
| 34 | — | 320 | 314 | 1050 |
| 34.5 | — | 324 | 318 | 1065 |
| 35 | — | 329 | 323 | 1080 |
| 35.5 | — | 333 | 327 | 1095 |
| 36 | — | 338 | 332 | 1110 |
| 36.5 | — | 342 | 336 | 1125 |
| 37 | — | 347 | 341 | 1140 |
| 37.5 | — | 352 | 345 | 1160 |
| 38 | — | 357 | 350 | 1175 |
| 38.5 | — | 362 | 355 | 1190 |
| 39 | 70 | 367 | 360 | 1210 |
| 39.5 | 70.3 | 372 | 365 | 1225 |
| 40 | 70.8 | 382 | 375 | 1260 |
| 40.5 | 70.5 | 377 | 370 | 1245 |
| 41 | 71.1 | 388 | 380 | 1280 |
| 41.5 | 71.3 | 393 | 385 | 1300 |
| 42 | 71.6 | 399 | 391 | 1320 |
| 42.5 | 71.8 | 405 | 396 | 1340 |
| 43 | 72.1 | 411 | 401 | 1360 |
| 43.5 | 72.4 | 417 | 407 | 1385 |
| 44 | 72.6 | 423 | 413 | 1405 |
| 44.5 | 72.9 | 429 | 418 | 1430 |
| 45 | 73.2 | 436 | 424 | 1450 |
| 45.5 | 73.4 | 443 | 430 | 1475 |
| 46 | 73.7 | 449 | 436 | 1500 |
| 46.5 | 73.9 | 456 | 442 | 1525 |
| 47 | 74.2 | 463 | 449 | 1550 |
| 47.5 | 74.5 | 470 | 455 | 1575 |
| 48 | 74.7 | 478 | 461 | 1605 |
| 48.5 | 75 | 485 | 468 | 1630 |
| 49 | 75.3 | 493 | 474 | 1660 |
| 49.5 | 75.5 | 501 | 481 | 1690 |
| 50 | 75.8 | 509 | 488 | 1720 |
| 50.5 | 76.1 | 517 | 494 | 1750 |
| 51 | 76.3 | 525 | 501 | 1780 |
| 51.5 | 76.6 | 534 | — | 1815 |
| 52 | 76.9 | 543 | — | 1850 |
| 52.5 | 77.1 | 551 | — | 1885 |
| 53 | 77.4 | 561 | — | 1920 |
| 53.5 | 77.7 | 570 | — | 1955 |
| 54 | 77.9 | 579 | — | 1995 |
| 54.5 | 78.2 | 589 | — | 2035 |
| 55 | 78.5 | 599 | — | 2075 |
| 55.5 | 78.7 | 609 | — | 2115 |
| 56 | 79 | 620 | — | 2160 |
| 56.5 | 79.3 | 631 | — | 2205 |
| 57 | 79.5 | 642 | — | 2250 |
| 57.5 | 79.8 | 653 | — | 2295 |
| 58 | 80.1 | 664 | — | 2345 |
| 58.5 | 80.3 | 676 | — | 2395 |
| 59 | 80.6 | 688 | — | 2450 |
| 59.5 | 80.9 | 700 | — | 2500 |
| 60 | 81.2 | 713 | — | 2555 |
| 60.5 | 81.4 | 726 | — | — |
| 61 | 81.7 | 739 | — | — |
| 61.5 | 82 | 752 | — | — |
| 62 | 82.2 | 766 | — | — |
| 62.5 | 82.5 | 780 | — | — |
| 63 | 82.8 | 795 | — | — |
| 63.5 | 83.1 | 810 | — | — |
| 64 | 83.3 | 825 | — | — |
| 64.5 | 83.6 | 840 | — | — |
| 65 | 83.9 | 856 | — | — |
| 65.5 | 84.1 | 872 | — | — |
| 66 | 84.4 | 889 | — | — |
| 66.5 | 84.7 | 906 | — | — |
| 67 | 85 | 923 | — | — |
| 67.5 | 85.2 | 941 | — | — |
| 68 | 85.5 | 959 | — | — |
| 68.5 | 85.8 | 978 | — | — |
| 69 | 86.1 | 997 | — | — |
| 69.5 | 86.3 | 1017 | — | — |
| 70 | 86.6 | 1037 | — | — |
HRC/HB Approximate Conversion Tips
The hardness is higher than 20HRC, 1HRC≈10HB,
The hardness is lower than 20HRC, 1HRC≈11.5HB.
Remarks: For cutting processing, it can basically be converted uniformly 1HRC≈10HB (the hardness of the workpiece material has a fluctuation range)
Hardness of metal material
Hardness refers to the ability of a material to resist local deformation, especially plastic deformation, indentation or scratching. It is an index to measure the softness and hardness of the material.
According to different test methods, hardness is divided into three types.
①Scratch hardness. It is mainly used to compare the softness and hardness of different minerals. The method is to choose a rod with one end hard and the other end soft, pass the material to be tested along the rod, and determine the hardness of the material to be tested according to the position of the scratch. Qualitatively speaking, hard objects make long scratches and soft objects make short scratches.
②Indentation hardness. Mainly used for metal materials, the method is to use a certain load to press the specified indenter into the material to be tested, and compare the softness and hardness of the material to be tested by the size of the local plastic deformation on the surface of the material. Due to the difference of indenter, load and load duration, there are many kinds of indentation hardness, mainly including Brinell hardness, Rockwell hardness, Vickers hardness and microhardness.
③ Rebound hardness. Mainly used for metal materials, the method is to make a special small hammer fall freely from a certain height to impact the sample of the material to be tested, and use the amount of strain energy stored (and then released) in the sample during the impact (through the return of the small hammer) jump height measurement) to determine the hardness of the material.
The most common Brinell hardness, Rockwell hardness and Vickers hardness of metal materials belong to the indentation hardness. The hardness value indicates the ability of the material surface to resist the plastic deformation caused by another object being pressed in; C) to measure the hardness, and the hardness value represents the size of the elastic deformation function of the metal.
Brinell Hardness
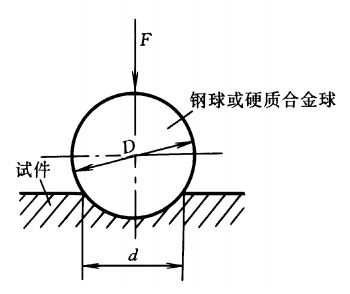
Use a quenched steel ball or hard alloy ball with a diameter of D as the indenter, press it into the surface of the test piece with the corresponding test force F, and after a specified holding time, remove the test force to obtain an indentation with a diameter of d. Divide the test force by the surface area of the indentation, and the resulting value is the Brinell hardness value, and the symbol is represented by HBS or HBW.
The difference between HBS and HBW is the difference in the indenter. HBS means that the indenter is a hardened steel ball, which is used to measure materials with a Brinell hardness value below 450, such as mild steel, gray cast iron and non-ferrous metals. HBW means that the indenter is cemented carbide, which is used to measure materials with a Brinell hardness value below 650.
For the same test block, when the other test conditions are exactly the same, the results of the two tests are different, and the HBW value is often greater than the HBS value, and there is no quantitative rule to follow.
After 2003, my country has equivalently adopted international standards, canceled steel ball indenters, and all used carbide ball heads. Therefore, HBS is discontinued, and HBW is used to represent the Brinell hardness symbol. In many cases, the Brinell hardness is only expressed in HB, referring to HBW. However, HBS is still seen from time to time in literature papers.
The Brinell hardness measurement method is suitable for cast iron, non-ferrous alloys, various annealed and quenched and tempered steels, and is not suitable for testing samples or cnc turning parts that are too hard, too small, too thin, or that do not allow large indentations on the surface.
Rockwell Hardness
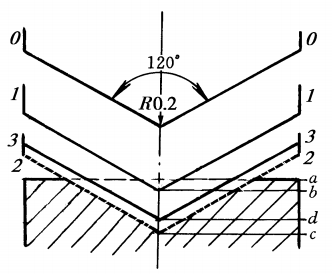
Use a diamond cone with a cone angle of 120° or Ø1.588mm and Ø3.176mm quenched steel balls as the indenter and the load to cooperate with it. The initial load is 10kgf and the total load is 60, 100 or 150kgf (that is, the initial load plus the main load). The hardness is expressed by the difference between the indentation depth when the main load is removed and the indentation depth when the main load is retained and the indentation depth under the initial load after the total load is applied.
The Rockwell hardness test uses three test forces and three indenters. There are 9 combinations of them, corresponding to the 9 scales of Rockwell hardness. The application of these 9 rulers covers almost all commonly used metal materials. There are three commonly used HRA, HRB and HRC, among which HRC is the most widely used.
Commonly used Rockwell hardness test specification table:
|
Hardness |
|
|
Hardness |
|
|
|
|
|
|
Carbide, carbide, |
|
|
|
|
|
Annealed, normalized steel, aluminum alloy |
|
|
|
|
|
hardened steel, quenched and tempered steel, deep |
The range of use of the HRC scale is 20~70HRC. When the hardness value is less than 20HRC, because the conical aluminum cnc machining part of the indenter is pressed too much, the sensitivity decreases, and the HRB scale should be used instead; when the hardness of the sample is greater than 67HRC, the pressure on the tip of the indenter is too large, and the diamond is easily damaged. The life of the indenter will be greatly shortened, so the HRA scale should generally be used instead.
The Rockwell hardness test is simple, rapid, and small indentation, and can test the surface of finished products and hard and thin workpieces. Due to the small indentation, for materials with uneven structure and hardness, the hardness value fluctuates greatly, and the accuracy is not as high as Brinell hardness. Rockwell hardness is used to determine the hardness of steel, non-ferrous metals, hard alloys, etc.
Vickers Hardness Vickers Hardness
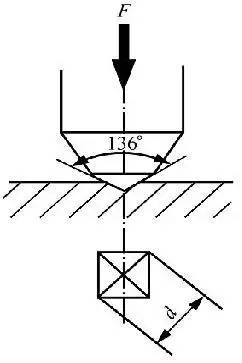
The principle of Vickers hardness measurement is similar to that of Brinell hardness. Use a diamond square pyramid indenter with an included angle of 136° to press into the surface of the material with a specified test force F, and remove the test force after maintaining the specified time. The hardness is expressed by the average pressure on the unit surface area of the square pyramid indentation. Value, the mark symbol is HV.
The Vickers hardness measurement range is large, and it can measure materials with a hardness ranging from 10 to 1000HV. The indentation is small, and it is generally used to measure thinner materials and surface hardened layers such as carburizing and nitriding.
Leeb Hardness Leeb Hardness
Use an impact body with a certain mass of tungsten carbide ball head to impact the surface of the test piece under the action of a certain force, and then rebound. Due to the different hardness of materials, the rebound speed after impact is also different. A permanent magnet is installed on the impact device. When the impact body moves up and down, its peripheral coil will induce an electromagnetic signal proportional to the speed, and then convert it into a Leeb hardness value through an electronic circuit. The symbol is marked as HL.
The Leeb hardness tester does not need a worktable, and its hardness sensor is as small as a pen, which can be directly operated by hand, and can be easily detected whether it is a large, heavy workpiece or a workpiece with complex geometric dimensions.
Another advantage of Leeb hardness is that it has very little damage to the surface of the product, and sometimes it can be used as a non-destructive test; it is unique in hardness tests in all directions, narrow spaces and special aluminum parts.
Anebon adheres on the tenet “Honest, industrious, enterprising, innovative” to acquire new solutions continuously. Anebon regards prospects, success as its personal success. Let Anebon build prosperous future hand in hand for brass machined parts and Complex titanium cnc parts / stamping accessories. Anebon now has comprehensive goods supply as well as selling price is our advantage. Welcome to inquire about Anebon’s products.
Trending Products China CNC Machinging Part and Precision Part, really should any of these items be of interest to you, please let us know. Anebon will be pleased to give you a quotation upon receipt of one’s detailed specifications. Anebon have our personal specialist R&D enginners to meet any of the requriements. Anebon look forward to receiving your enquires soon and hope to have the chance to work together with you inside the future. Welcome to take a look at Anebon organization.


