- Home
- News
- Beyond Standard Measurements: Exploring the Advanced Features of Callimeters and Micrometers
Beyond Standard Measurements: Exploring the Advanced Features of Callimeters and Micrometers
Do you understand the relationship between vernier calipers and micrometers and the CNC industry?
Both vernier calipers and micrometers are precision measuring tools commonly used in the CNC industry for accurate dimensional measurements.
Vernier calipers, also known as vernier scales or sliding calipers, are handheld measuring instruments used to measure external dimensions (length, width, and thickness) of objects. They consist of a main scale and a sliding vernier scale, which allows for precise readings beyond the resolution of the main scale.
Micrometers, on the other hand, are more specialized and capable of measuring extremely small distances with high accuracy. They are used to measure dimensions such as diameter, thickness, and depth. Micrometers provide measurements in micrometers (µm) or thousandths of a millimeter.
In the CNC industry, precision is crucial for ensuring accurate machining and manufacturing processes. Vernier calipers and micrometers play vital roles in quality control, inspection, and precise measurements of CNC machined parts. They enable CNC operators and technicians to verify dimensions, maintain tight tolerances, and ensure the proper functioning of CNC machines.
The combination of CNC technology and precise measuring tools like vernier calipers and micrometers helps streamline production processes, improve efficiency, and deliver high-quality CNC-machined components.
Overview of Vernier Calipers
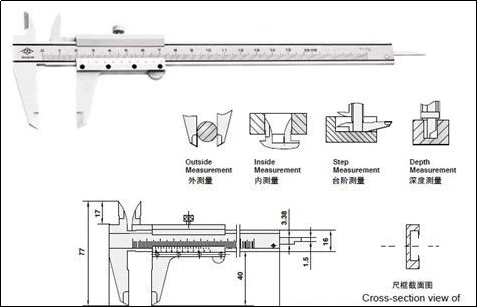
As a widely used high-precision measuring tool, the vernier caliper is composed of two parts: a main scale and a sliding vernier attached to the main scale. If divided according to the scale value of the vernier, the vernier caliper is divided into three types: 0.1, 0.05, and 0.02mm.
How to read vernier calipers
Taking the precision vernier caliper with a scale value of 0.02mm as an example, the reading method can be divided into three steps;
1) Read the whole millimeter according to the nearest scale on the main scale to the left of the zero line of the auxiliary scale;
2) Multiply 0.02 to read the decimal according to the number of engraved lines aligned with the scale on the main scale on the right side of the zero line of the auxiliary scale;
3) Add up the integer and decimal parts above to get the total size.
The reading method of 0.02mm vernier caliper
As shown in the figure above, the scale on the front of the main scale facing the 0 line of the sub scale is 64mm, and the 9th line after the 0 line of the sub scale is aligned with a engraved line of the main scale.
The 9th line after the 0 line of the sub-scale means: 0.02×9= 0.18mm
So the size of the measured workpiece is: 64+0.18=64.18mm
How to use the vernier caliper
Bring the jaws together to see if the vernier is aligned with the zero mark on the main scale. If it is aligned, it can be measured: if it is not aligned, zero error should be recorded: the zero scale line of the vernier is called positive zero error on the right side of the zero scale line on the ruler body, and the negative zero error is called negative zero error on the left side of the zero scale line on the ruler body (this This method of regulation is consistent with the regulation of the number axis, the origin is positive when the origin is on the right, and negative when the origin is on the left).
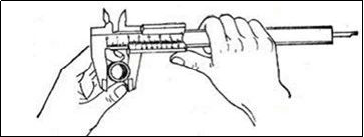
When measuring, hold the ruler body with your right hand, move the cursor with your thumb, and hold the cnc aluminum parts with the outer diameter (or inner diameter) with your left hand, so that the object to be measured is located between the outer measuring claws, and when it is tightly attached to the measuring claws, you can Reading, as shown in the figure below:
Application of Vernier Calipers in CNC Machining Services
As a common measuring tool, vernier caliper can be used in the following four aspects:
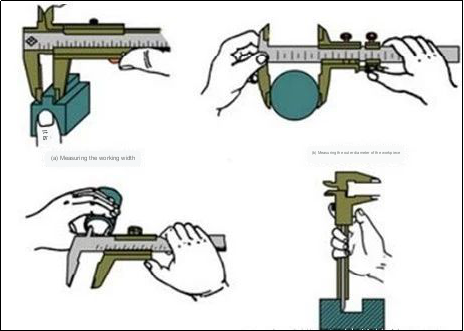
1) Measure the width of the workpiece
2) Measure the outer diameter of the workpiece
3) Measure the inner diameter of the workpiece
4) Measure the depth of the workpiece
The specific measurement methods of these four aspects are shown in the figure below:
Precautions for use
The vernier caliper is a relatively precise measuring tool, and the following items should be paid attention to when using it:
1. Before use, clean the measuring surface of the two clip feet, close the two clip feet, and check whether the 0 line of the auxiliary ruler is aligned with the 0 line of the main ruler. If not, the measurement reading should be corrected according to the original error.
2. When measuring the workpiece, the measuring surface of the clamp foot must be parallel or perpendicular to the surface of the workpiece, and must not be skewed. And the force should not be too large, so as not to deform or wear the clip feet, which will affect the measurement accuracy. 3. When reading, the line of sight should be perpendicular to the scale surface, otherwise the measured value will be inaccurate.
4. When measuring the inner diameter, shake it slightly to find the maximum value.
5. After the vernier caliper is used up, wipe it carefully, apply protective oil, and place it flat in the cover. in case it gets rusted or bent.
The spiral micrometer, also called the micrometer, is a precise measuring tool. The principle, structure and usage of the spiral micrometer will be explained below.
What is a Spiral Micrometer?
Spiral micrometer, also known as micrometer, spiral micrometer, centimeter card, is a more precise tool for measuring length than vernier caliper. It can measure length accurately to 0.01mm, and the measuring range is several centimeters.
Structure of a spiral micrometer
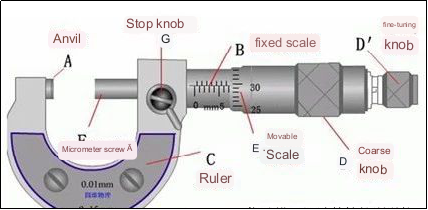
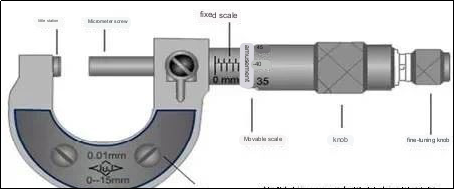
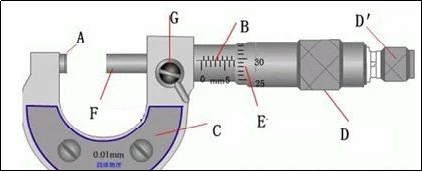
The following is a schematic diagram of the structure of the spiral micrometer:
Working principle of screw micrometer
The screw micrometer is made according to the principle of screw amplification, that is, the screw rotates once in the nut, and the screw advances or retreats along the direction of the rotation axis by a distance of one pitch. Therefore, the small distance moved along the axis can be expressed by the reading on the circumference.
The pitch of the precision thread of the screw micrometer is 0.5mm, and the movable scale has 50 equally divided scales. When the movable scale rotates once, the micrometer screw can advance or retreat by 0.5mm, so rotating each small division is equivalent to measuring The micro screw advances or retreats 0.5/50=0.01mm. It can be seen that each small division of the movable scale represents 0.01mm, so the screw micrometer can be accurate to 0.01mm. Because it can be estimated to read another one, it can be read to the thousandth of millimeters, so it is also called the micrometer.
How to use the spiral micrometer
When we often help customers connect our data acquisition instrument with a spiral micrometer for high-efficiency measurement, we often guide customers to do the following when making a spiral micrometer:
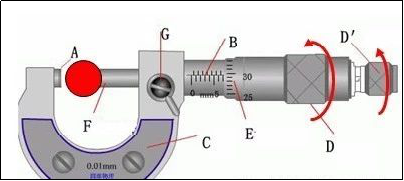
1. Check the zero point before use: slowly turn the fine-tuning knob D′ to make the measuring rod (F) contact with the measuring anvil (A) until the ratchet makes a sound. At this time, the zero point on the movable ruler (movable sleeve) The engraved line should be aligned with the reference line (long horizontal line) on the fixed sleeve, otherwise there will be zero error.
2. Hold the ruler frame (C) in the left hand, turn the coarse adjustment knob D with the right hand to make the distance between the measuring rod F and the anvil A slightly larger than the measured object, put the measured object in, turn the protection knob D’ to clamp the measured object until Until the ratchet makes a sound, turn the fixed knob G to fix the measuring rod and take a reading.
Reading method of screw micrometer
1. Read the fixed scale first
2. Read the half scale again, if the half scale line is exposed, record it as 0.5mm; if the half scale line is not exposed, record it as 0.0mm;
3. Read the movable scale again (pay attention to the estimate), and record it as n×0.01mm;
4. The final reading result is fixed scale + half scale + movable scale
Because the reading result of the spiral micrometer is accurate to the thousandth in mm, the spiral micrometer is also called the micrometer.
Precautions for spiral micrometer
1. When measuring, pay attention to stop using the knob when the micrometer screw is approaching the object to be measured, and use the fine-tuning knob instead to avoid excessive pressure, which can not only make the measurement result accurate, but also protect the screw micrometer.
2. When reading, pay attention to whether the engraved line indicating half a millimeter on the fixed scale has been exposed.
3. When reading, there is an estimated number in the thousandth place, which cannot be thrown away casually. Even if the zero point of the fixed scale is just aligned with a certain scale line of the movable scale, the thousandth place should also be read as “0″.
4. When the small anvil and the micrometer screw are close together, the zero point of the movable scale does not coincide with the zero point of the fixed scale, and there will be a zero error, which should be corrected, that is, the value of the zero error should be removed from the reading of the final length measurement.
Proper Use and Maintenance of Spiral Micrometer
• Check whether the zero line is accurate;
• When measuring, the measured surface of the workpiece should be wiped clean;
• When the workpiece is large, it should be measured on a V-shaped iron or flat plate;
• Wipe the measuring rod and anvil clean before measuring;
• A ratchet device is required when screwing the movable sleeve;
• Do not loosen the back cover, so as not to change the zero line;
• Do not add ordinary engine oil between the fixed sleeve and the movable sleeve;
• After use, wipe off the oil and put it in a special box in a dry place.
Anebon pursuit and enterprise goal is to “Always satisfy our customer requirements”. Anebon keep on to establish and style and design outstanding top quality goods for both our outdated and new prospects and realize a win-win prospect for our clientele just like we customize high-precision extrusion profiles, cnc turning aluminum parts and aluminum milling parts for customers. Anebon with open arms, invited all interested buyers to visit our website or contact us directly for further information.
Factory Customized China CNC Machine and CNC Engraving Machine, Anebon’s product are widely recognized and trusted by users and can meet continuously developing economic and social needs. Anebon welcome new and old customers from all walks of life to contact us for future business relationships and achieving mutual success!
